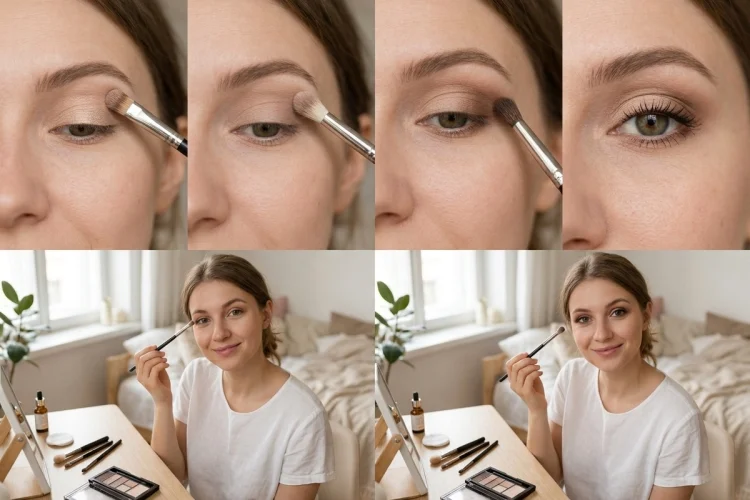
Eyeshadow can look intimidating when you first open a palette filled with twelve different colors. Which shade goes on the lid? Where exactly is the crease? And why does everyone seem to own five different blending brushes?
The good news is that everyday eye makeup does not need to be complicated. You can create a polished look with just two or three neutral shades and a couple of basic brushes.
In fact, keeping things simple is usually the easiest way to learn how colors, placement, and blending work together.
Learning how to apply eyeshadow for a simple everyday makeup look starts with understanding a few basic areas of the eye: the eyelid, crease, outer corner, and optional inner corner. From there, you simply move from lighter colors to slightly deeper shades.
Maybelline recommends a similar beginner approach, using a neutral base, a transition shade through the crease, and deeper color around the outer corner.
Here is how to turn those basics into an easy routine you can actually use every day.
1. Start With a Small Neutral Eyeshadow Palette
You do not need dozens of colors for an everyday eyeshadow look.
A compact palette containing beige, taupe, soft brown, caramel, peach, or muted rose shades is usually enough. Neutral colors are beginner-friendly because small blending mistakes tend to be less noticeable than they would be with very dark or highly saturated shades.
For the simplest routine, look for three basic colors: a light-to-medium lid shade, a medium transition color, and a slightly deeper shade for the outer corner.
You can also include one subtle shimmer if you enjoy a brighter finish.
Maybelline describes neutral tones as a practical starting point for beginner looks and recommends using a transition shade through the crease before adding deeper color for definition.
Do not worry about creating complicated color combinations yet. Learning where to place three simple shades will teach you far more than owning a huge palette you are afraid to use.
2. Prepare Your Eyelids Before Applying Color
Eyeshadow usually applies more evenly when the eyelids have a clean, balanced base.
If your lids become oily during the day, an eyeshadow primer can help provide a more stable surface for color. Primer may also help reduce fading and creasing.
e.l.f. recommends applying a thin layer of eye primer and allowing it to set before moving on to eyeshadow.
You do not necessarily need a separate primer for a casual everyday look. Some people use a very thin layer of concealer instead, although formulas can behave differently depending on your skin and products.
The main goal is avoiding thick layers.
Heavy concealer followed by several layers of powder and eyeshadow may make the lids look textured.
Start with as little product as necessary, blend it evenly, and give it a moment to settle.
3. Learn the Basic Areas of Your Eye
Eyeshadow becomes much easier once you understand where different colors usually go.
The lid is the main visible area between your lash line and crease. This is where you can place your primary eyeshadow color.
The crease is the natural fold above your eyelid. A slightly deeper shade in this area helps create depth.
The outer corner is the outside third of the eyelid. Placing a deeper color here can add definition without turning your everyday look into a dramatic smoky eye.
Finally, the inner corner near your nose can be highlighted with a lighter shade if you want your eyes to appear brighter.
e.l.f. suggests thinking about the eyelid in similar zones: lighter colors toward the inner area, medium tones across the lid, and deeper shades around the crease and outer corner.
Once you understand these zones, most basic eyeshadow tutorials suddenly become much easier to follow.
4. Apply a Soft Transition Shade Through the Crease
Your transition shade helps connect the rest of your eye makeup.
Choose a matte shade slightly deeper than your skin tone. Soft brown, taupe, peach, or muted caramel are common options depending on your complexion.
Use a fluffy blending brush and place the color gently through your crease.
Maybelline recommends using a matte transition shade in this area to create definition while helping the rest of the eyeshadow blend smoothly.
Try small circular motions along with gentle back-and-forth movements.
Avoid pressing the brush too hard.
The color should gradually fade as it approaches the area underneath your brow. If you see a strong stripe, keep blending rather than immediately adding another shade.
For everyday makeup, one soft crease color may already provide enough definition.
5. Add Your Main Color Across the Eyelid
Next comes the easiest part: applying color to the eyelid.
Choose a neutral shade that complements your crease color. You might pair a soft brown crease with beige, champagne, peach, bronze, or muted rose across the lid.
Use a flat eyeshadow brush or your fingertip.
Instead of sweeping the color aggressively back and forth, gently press or pat it onto the eyelid. This technique usually provides more even placement while reducing unnecessary fallout.
Maybelline recommends tapping excess powder from your brush before application and applying shadow from the inner toward the outer portion of the lid.
For a daytime look, you do not need intense pigmentation.
One light layer can be enough.
If you prefer a little brightness, choose a satin or subtle shimmer. If you want the most understated result possible, stick with a matte finish.
6. Add a Slightly Deeper Shade to the Outer Corner
Adding depth does not mean creating a dramatic smoky eye.
Take a slightly deeper brown or neutral shade and apply a small amount to the outer third of your eyelid.
Keep most of the pigment near the outer corner, then softly blend it into the crease.
e.l.f. recommends using deeper colors around the outer corner before switching to a fluffy blending brush to soften the transition.
Maybelline uses a similar technique in its beginner tutorial, applying deeper shadow to the outer corners to add dimension.
Start with very little product.
Your outer shade should create a subtle shadow rather than an obvious dark patch.
If the difference between the lid and outer corner looks too sharp, return to your clean blending brush and soften the border where the two shades meet.
7. Blend Until You Cannot See Harsh Edges
Blending is probably the most important eyeshadow skill you can practice.
Good blending does not mean mixing every shade until they become one muddy color. You still want to see some difference between the lid, crease, and outer corner.
The goal is simply removing obvious borders.
Use a clean fluffy brush and lightly move it over the edges of your eyeshadow. Small circular motions can help soften concentrated areas, while gentle back-and-forth movements work well through the crease.
L’Oréal Paris identifies blending as one of the fundamental parts of successful eyeshadow application and recommends paying attention to smooth transitions between shades.
If the colors begin disappearing because you have blended too much, simply add a tiny amount back.
Eyeshadow is usually easier when you work gradually: apply a little, blend, check, and repeat.
8. Brighten the Inner Corner Only If You Want To
Inner-corner highlight is completely optional, but it can make a simple everyday look feel more finished.
Choose a light champagne, beige, pearl, or subtle shimmer shade.
Use your fingertip or a small detail brush to place a tiny amount around the inner corner of your eye.
Both Maybelline and e.l.f. recommend lighter shades around this area when you want to create a brighter, more awake-looking effect.
Do not extend the shimmer too far across the nose.
A small touch is usually enough.
You can also lightly place the same color underneath the highest area of your brow if that suits your makeup style, although this step is unnecessary for a truly minimal daytime routine.
9. Keep Your Lower Lash Line Soft
Adding eyeshadow underneath the eye can make your look feel more balanced, but this step should stay subtle for everyday makeup.
Take a small amount of the same transition shade you used in your crease.
Using a small brush, gently blend it along the outer half of your lower lash line.
Do not immediately use the darkest color in your palette.
e.l.f. recommends following the natural curve of the lower lash line and softly blending the shadow rather than creating a harsh line.
If you have very small eyes or simply prefer a brighter appearance, you can skip lower-lash eyeshadow altogether.
Remember that everyday makeup should work for your preferences and routine. Every tutorial step does not have to become mandatory.
10. Finish With Mascara and Keep Everything Clean
Once your eyeshadow is blended, mascara can finish the look without requiring complicated eyeliner.
Curl your lashes if you like, then apply mascara from the roots upward.
You can also add a thin line of brown or black eyeliner close to your lashes if you want more definition, but it is completely optional.
Eye makeup hygiene matters as well.
The FDA recommends washing your hands before applying eye cosmetics, keeping applicators clean, and avoiding shared eye makeup because contamination can increase the risk of infection.
The agency also advises stopping the use of eye cosmetics if irritation develops and discarding products that were being used during an eye infection.
A beautiful everyday eye look should never come at the expense of basic hygiene.
Learning how to apply eyeshadow for a simple everyday makeup look becomes much easier when you stop trying to use every color in your palette.
Start with a neutral transition shade in the crease, add a soft color across the lid, and use a slightly deeper tone around the outer corner.
Blend each layer gradually and keep the overall intensity light. You can add an inner-corner highlight, lower-lash shadow, eyeliner, or shimmer when you want something extra, but none of those steps are required.
Most importantly, practice the same simple combination several times before attempting complicated looks.
Choose three neutral shades from your palette tomorrow and create a basic lid, crease, and outer-corner look. Once that routine feels effortless, experimenting with new colors and finishes will become much easier.